How to use Curves in Photoshop
Curves in Photoshop is a really powerful tool to use. It gives great control over tones and contrast of your image and even allows you to control the tones and contrast of certain colour ranges within your image. It can be quite daunting at first but when you get used to it you’ll find you’ll apply curves to nearly every image you process in Photoshop.
Control your photography and be more creative with our online courses. Click below for more info.
Video Summary
Curves Adjustment Layers
Always try to use a curves adjustment layer. This will create non-destructive moves that can be adjusted or deleted without effecting the original image. You can add a curves adjustment layer in your adjustment palette or by clicking the add adjustment layer icon which is located at the bottom of the layer’s palette.
Curves adjustment Properties box
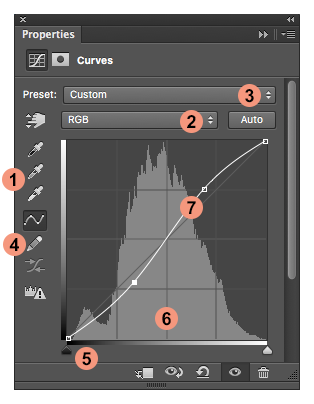
The Curves adjustment properties box
1 Eyedroppers
This tool allows you to choose a white, black or midtone grey spot on your image to balance your image back to white light.
2 RGB dropdown
Here you can select the different colour channels red, green or blue. Then you can adjust the contrast and tones of that particular channel.
3 Preset
Choose from a list of presets that Photoshop has made for you. Good to experiment with or if you want a quick fix.
4 Pencil and smooth
Use this to draw a freehand Curve. Use the 'Smooth Curves values' option to smooth the line if needed.
5 White and black points
Drag these inwards to set new white and black points. If you hold ‘Alt’ while dragging you can view any clipped pixels. This works similar to levels.
6 Histogram
This a visual representation of all the tones in your image, it shows a 'tonal range'. Shadows are on the left and highlights on the right. If you chose a colour channel it will only show you the tonal range within that colour.
7 Curve line
Push this line up to lighten and pull down to darken. Each time you do this on a new part of the line you will create a new anchor point.
Highlights and Shadows
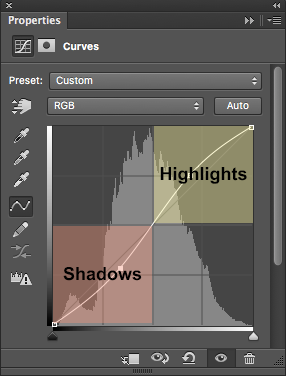
Curves properties box showing the highlight and shadow areas
The top right 4 squares are for your highlight areas - The bottom 4 squares are for your shadow areas.
The Famous 'S' curve
An ‘S’ curve is where you move the line into the shape of the letter ‘S’. This will give contrast and depth to your image.
Colour Channels
You can separate the curves into the Red, Green and Blue colour channels. By pushing the line up you increase the selected named colour, i.e. Red, pulling down the line will remove this colour and increase its opposite colour on the CMYK colour wheel, i.e. Cyan.
Red - Cyan
Green – Magenta
Blue – yellow
The layer’s mask
You can use the layer’s mask to remove areas you don’t want, i.e. any areas that go too dark. You do this by painting black onto the curve layer’s mask.
Want 10% off your first course? Click here
Get instant access to all our high-quality online courses
Like this? - Check out similar tutorials below
I hope you liked this tutorial, please leave us a comment and support us by sharing it with your friends and subscribe to our newsletter at the bottom of this page for more.
We also have an excellent learning community on social media so please join us there as well.
Thanks for watching and remember – Learn more at The School of Photography.


